1994年陕西机械学院更名为西安理工大学。1998年历史关系划转陕西省,是工业和信息化部与陕西省共建高校。

历史沿革
学校以1949年人民政府接管国立北平高级工业职业学校为建校年,前身是北京机械学院和陕西工业大学于1972年合并组建的陕西机械学院,1994年经教育部批准更名为西安理工大学。1998年学校由机械工业部划转陕西省。2002年,陕西省批准西安仪表工业学校整体并入西安理工大学。
学校最早可追溯到1949年人民政府接管的北京机械学院前身学校国立北平高级工业职业学校
北京机械学院
1946年,国立北平高级工业职业学校创建。
1950年,国立北平高级工业职业学校更名为北京重工业学校,后更名为北京机器制造学校。
1958年,北京机器制造学校、北京工业管理学校、北京工业干部学校合并升格为北京机械学院,隶属于第一机械工业部。
文革开始后不久,受国内外形势影响,中央决定将北京十三所重点高校外迁。1969年,根据林彪“第一号通令”,北京机械学院等13所“京校外迁”高校被迫迁出北京。北京机械学院迁至陕西。
陕西工业大学
1937年,国立西安临时大学工学院土木工程学系水利组成立,同年改建为国立西北联合大学工学院水利工程学系。
1938年,西北联合大学工学院水利系成为西北工学院水利系。
1956年,西北工学院电机系、水利系,北京动力学院,山东大学土木系、青岛工学院水利系、西北农学院水利系、苏南工业专科学校合并组建西安动力学院。
1957年,西安动力学院、西北工学院采矿纺织系并入交通大学(西安)。
1958年,西北工学院化工系部分改建西安化工学院。
1960年,西安交通大学水利系、纺织系,西安化工学院部分合并升格为陕西工业大学。
1960年,开始研究生教育。
1961年,陕西科技大学(1960年创建)并入陕西工业大学。
1962年,西安机械专科学校(1958年创建)并入陕西工业大学。
两校合并
1972年,北京机械学院、陕西工业大学(可追溯到1937年的国立西安临时大学工学院)合并组建陕西机械学院,隶属机械工业部。还有一部分以印刷专业为主在北京黄庄成立了北京印刷学院。
1970年,陕西工业大学纺织系参与合并组建西北轻工业学院(今西安工程大学)。
1972年,陕西工业大学化工系并入西北大学。
1981年,经国家教委批准,陕西机械学院北京留守处(原北京机械学院北京遗留部分)定名为陕西机械学院北京研究生部。
1981年11月,经国务院批准,学校成为全国首批博士和硕士学位授予单位。
1986年,陕西机械学院北京研究生部和北京机械工业管理专科学校合并成立的北京机械工业管理学院,隶属于机械工业部。1990年,北京机械工业管理学院更名为北京机械工业学院。1998年划转北京市管理,后于2003年参与组建北京信息科技大学。
1994年,陕西机械学院更名为西安理工大学。
1998年,学校由机械工业部划转陕西省,实行中央与地方共建,以地方管理为主的管理体制。
2002年,陕西省批准西安仪表工业学校整体并入西安理工大学。
2006年,西安理工大学高科学院(独立本科院校)获教育部批准成立。
2008年,学校入选国家大学生创新性实验计划。
2010年6月,入选教育部第一批“卓越工程师教育培养计划”高校。同年,入选国家“特色重点学科项目”建设高校。
2011年5月,被教育部评为“全国毕业生就业典型经验高校”。9月,经陕西省政府同意,省教育厅批准,西安理工大学研究生院成立。年底,入选国家建设高水平大学公派研究生项目。
2020年7月,西安理工大学成为陕西省与工业和信息化部共建高校。
优势专业
截至2019年2月,学校设有23个本科实验教学中心,其中有3个国家级实验教学示范中心,10个陕西省高等学校实验教学示范中心。有国家级特色专业10个、陕西省一流专业21个、陕西省名牌专业8个、省级特色专业16个;
截至2019年12月,有11个国家级一流本科专业建设点、11个省级一流本科专业建设点。
学校是中国人民解放军海军后备军官选拔和培训基地,是教育部本科教学工作水平评估优秀学校、首批实施教育部“卓越工程师教育培养计划”高校,2013年作为全国试点高校率先通过教育部本科教学工作审核评估。学校是教育部专业学位研究生教育、研究生课程建设综合改革试点单位,建有2个专业学位研究生联合培养实践全国示范性基地,8个陕西省研究生联合培养示范工作站。
国家级一流本科专业建设点:机械设计制造及其自动化、测控技术与仪器、材料科学与工程、能源与动力工程、、电气工程及其自动化、电子科学与技术、自动化、土木工程、计算机科学与技术、水利水电工程、印刷工程、环境工程、工商管理
国家级特色专业:水利水电工程、能源与动力工程、自动化、机械设计制造及其自动化、电子科学与技术、材料科学与工程、电气工程及其自动化、材料成型及控制工程、测控技术与仪器、工商管理
学科建设
截至2019年5月,学校建有9个博士后科研流动站,14个博士学位授权一级学科,25个硕士学位授权一级学科,11个硕士专业学位授权点;1个国家一级重点学科(涵盖5个二级学科),21个陕西省重点学科,12个陕西省优势学科。工程学学科、材料科学学科位列ESI全球学科排名前1%。在2017年全国第四轮学科评估中,水利工程、控制科学与工程、管理科学等3个学科进入全国前20%,材料科学与工程、机械工程、马克思主义理论学科进入全国前30%;仪器科学与技术、电子科学与技术、土木工程、环境科学与工程、工商管理学科进入全国前40%。
国家重点学科:一级学科:水利工程(包括:水文学及水资源、水力学及河流动力学、水工结构工程、水利水电工程、港口海岸及近海工程)
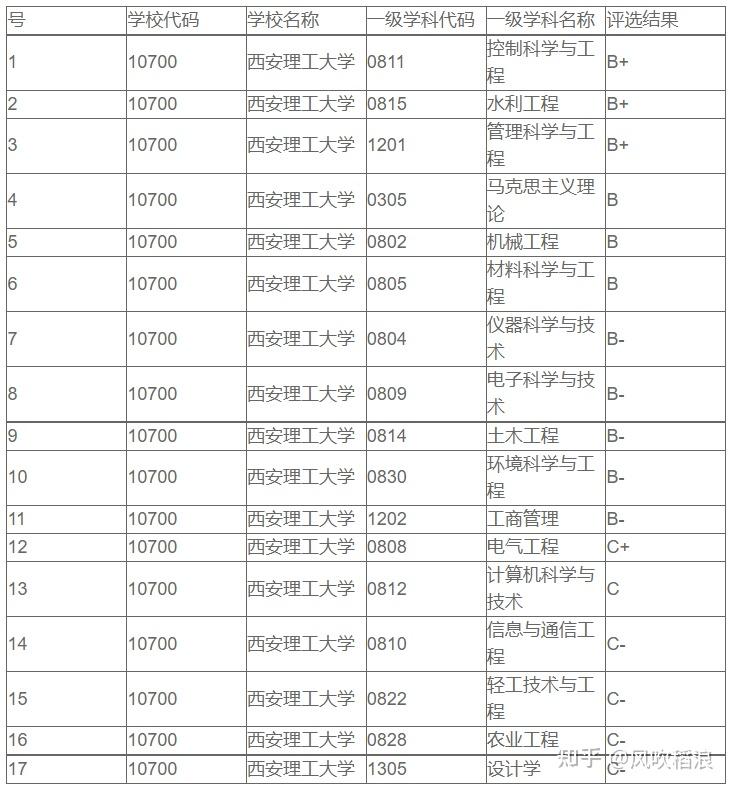
学科评估
根据教育部最新发布的全国第四轮学科评估结果可知,西安理工大学有控制科学与工程、水利工程、管理科学与工程3个一级学科评估为B+,以下是具体评估结果
录取情况
西安理工大学2021年在浙江省的录取情况如下:
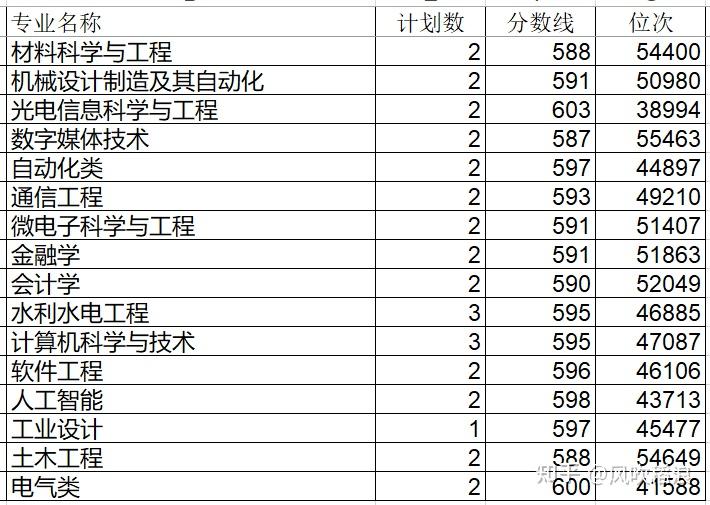
招生专业中,水利水电工程和计算机科学与技术为招生人数最多的专业,计划数3人,录取分数线/位次为595分/46885位和595分/47087位;
录取分数线最高的专业为光电信息科学与工程,录取分数线/位次为603分/38994位。
录取分数线最低的专业为数字媒体技术,录取分数线/位次为587分/55463位。
从2021年的情况看,位次在39000-55000名的学生可以选择报西安理工大学
Hipster
Back Pose
Forehead to Forehead
Lift
Walking
Bride Groom
15 【💍在旧金山(SF) City Hall结婚攻略👰🏻♀️ – susieesuu | 小红书 – 你的生活指南】 😆 NKWkj4BuYuQkfYw 😆 https://www.xiaohongshu.com/discovery/item/678952370000000021000cd5?source=webshare&xhsshare=pc_web&xsec_token=AB9dJePuLUwQNw4SjaypCdcN8K1pqp6m-y2NAAzHwxmQ0=&xsec_source=pc_share
In WordPress, when using the Query Loop block in the Block Editor, the default behavior is that each item (post) appears on a new line. However, if you want the items to appear inline (following the flow of the previous item instead of starting on a new line), you can achieve this by customizing the layout using CSS.
inline-query-loopYou can add this CSS in the Customizer → Additional CSS or in your theme’s CSS file:
.inline-query-loop {
    display: flex;
    flex-wrap: wrap;
    gap: 5px; /* Adjust the space between posts */
    list-style: none; /* Remove default list styling */
    padding: 0;
    margin: 0;
}

.inline-query-loop .wp-block-post {
    display: inline-block;
    white-space: nowrap; /* Ensures text does not wrap inside */
}
If you want a structured layout rather than pure inline elements:
.inline-query-loop .wp-block-post-template {
    display: grid;
    grid-template-columns: repeat(auto-fit, minmax(200px, 1fr)); /* Adjust width */
    gap: 20px;
}
This will make the posts appear in a grid format.
If you’re coding a custom Query Loop in a theme, you can modify the WordPress Loop like this:
<?php
$args = array(
    'post_type' => 'post',
    'posts_per_page' => 6
);
$query = new WP_Query($args);
if ($query->have_posts()) :
    echo '<div class="custom-query-loop">';
    while ($query->have_posts()) : $query->the_post();
        echo '<div class="post-item">';
        the_title('<h2>', '</h2>');
        the_excerpt();
        echo '</div>';
    endwhile;
    echo '</div>';
    wp_reset_postdata();
endif;
?>
Then, in your CSS:
.custom-query-loop {
    display: flex;
    flex-wrap: wrap;
    gap: 20px;
}

.post-item {
    display: inline-block;
    width: auto;
}
display: flex or grid.Would you like me to help with a specific theme or plugin? 😊
Yes, you can absolutely place an image on top of another image in WordPress. There are several ways to achieve this, depending on your desired effect and level of technical comfort:
1. Using the WordPress Block Editor (Gutenberg):
To enable the block editor (Gutenberg) for your custom post type “book” (or whatever your post type is), you need to modify the register_post_type arguments within your functions.php file or custom plugin. Specifically, you need to add or modify the supports argument.
Here’s how you can do it:
1. Modify the supports Argument:
In your create_book_post_type() function (or the function where you register your custom post type), locate the supports array.
supports doesn’t exist, create it.supports exists, add or ensure that 'editor' is included.Here’s the modified code snippet:
PHP
function create_book_post_type() {
    // ... (Your labels and other args) ...

    $args = array(
        // ... (Your other arguments) ...
        'supports'            => array( 'title', 'editor', 'thumbnail', 'custom-fields' ), // Ensure 'editor' is present
        // ... (Your other arguments) ...
    );
    register_post_type( 'book', $args );
}
add_action( 'init', 'create_book_post_type', 0 );
Explanation:
'editor' element within the supports array tells WordPress to enable the block editor for your custom post type.'editor' support is not declared, then WordPress will default to the classic editor.2. Enable Template Support (Optional but Recommended):
If you want to use block templates (predefined block layouts) for your “book” post type, you can also add 'template' to the supports array:
PHP
$args = array(
    // ...
    'supports' => array( 'title', 'editor', 'thumbnail', 'custom-fields', 'template' ),
    // ...
);
3. Create Block Templates (Optional):
If you enabled template support, you can create block templates to define the initial content and layout for new “book” posts. Here’s how:
functions.php file or a custom plugin, use the register_block_template function.PHP
function register_book_template() {
    $post_type_object = get_post_type_object( 'book' );
    $post_type_object->template = array(
        array( 'core/paragraph', array(
            'placeholder' => 'Enter book description here...',
        ) ),
        array( 'core/image', array(
            'align' => 'center',
        )),
        array( 'core/heading', array(
            'placeholder' => 'Additional Information',
            'level' => 3,
        )),
    );
}
add_action( 'init', 'register_book_template' );
Important Notes:
functions.php file, clear your website’s cache (if you’re using a caching plugin) to ensure the changes take effect.By making these changes, you’ll successfully enable the block editor for your “book” custom post type, giving you the flexibility and power of Gutenberg for creating your book content.
The single-{post-type}.php template in WordPress allows you to create a custom layout for individual posts of a specific custom post type. Here’s a step-by-step guide on how to add and use it:
1. Create Your Custom Post Type (If You Haven’t Already):
functions.php file or a custom plugin.functions.php):PHP
function create_book_post_type() {
    $labels = array(
        'name'               => 'Books',
        'singular_name'      => 'Book',
        'menu_name'          => 'Books',
        'add_new'            => 'Add New Book',
        'add_new_item'       => 'Add New Book',
        'edit_item'          => 'Edit Book',
        'new_item'           => 'New Book',
        'view_item'          => 'View Book',
        'search_items'       => 'Search Books',
        'not_found'          => 'No Books found',
        'not_found_in_trash' => 'No Books found in Trash',
    );
    $args = array(
        'label'               => 'Books',
        'description'         => 'Books information pages.',
        'labels'              => $labels,
        'supports'            => array( 'title', 'editor', 'thumbnail', 'custom-fields' ),
        'hierarchical'        => false,
        'public'              => true,
        'show_ui'             => true,
        'show_in_menu'        => true,
        'menu_position'       => 5,
        'show_in_admin_bar'   => true,
        'show_in_nav_menus'   => true,
        'can_export'          => true,
        'has_archive'         => true,
        'exclude_from_search' => false,
        'publicly_queryable'  => true,
        'capability_type'     => 'post',
        'rewrite'             => array( 'slug' => 'book' ),
    );
    register_post_type( 'book', $args );
}
add_action( 'init', 'create_book_post_type', 0 );
2. Create the single-{post-type}.php Template File:
single-book.php (replace “book” with your custom post type’s slug).3. Add Content to Your Template:
single-book.php in a text editor and add the necessary WordPress template tags to display your post’s content.single-book.php:PHP
<?php
/**
 * The template for displaying single book posts.
 *
 * @link https://developer.wordpress.org/themes/basics/template-hierarchy/#single-post
 *
 * @package Your_Theme_Name
 */

get_header();
?>

<div id="primary" class="content-area">
    <main id="main" class="site-main">

        <?php
        while ( have_posts() ) :
            the_post();
            ?>

            <article id="post-<?php the_ID(); ?>" <?php post_class(); ?>>
                <header class="entry-header">
                    <?php the_title( '<h1 class="entry-title">', '</h1>' ); ?>
                </header><div class="entry-content">
                    <?php
                    the_content();

                    // Display custom fields
                    if (get_post_meta( get_the_ID(), 'author', true )){
                        echo "<p>Author: ".get_post_meta( get_the_ID(), 'author', true )."</p>";
                    }
                    if (get_post_meta( get_the_ID(), 'isbn', true )){
                        echo "<p>ISBN: ".get_post_meta( get_the_ID(), 'isbn', true )."</p>";
                    }

                    wp_link_pages(
                        array(
                            'before' => '<div class="page-links">' . esc_html__( 'Pages:', 'your-theme-text-domain' ),
                            'after'  => '</div>',
                        )
                    );
                    ?>
                </div><footer class="entry-footer">
                    <?php
                    edit_post_link(
                        sprintf(
                            wp_kses(
                                /* translators: %s: Name of current post. Only visible to screen readers */
                                __( 'Edit <span class="screen-reader-text">%s</span>', 'your-theme-text-domain' ),
                                array(
                                    'span' => array(
                                        'class' => array(),
                                    ),
                                )
                            ),
                            wp_kses_post( get_the_title() )
                        ),
                        '<span class="edit-link">',
                        '</span>'
                    );
                    ?>
                </footer></article><?php
            // If comments are open or we have at least one comment, load up the comment template.
            if ( comments_open() || get_comments_number() ) :
                comments_template();
            endif;

        endwhile; // End of the loop.
        ?>

    </main></div><?php
get_sidebar();
get_footer();
4. View Your Custom Post Type Posts:
single-book.php template.Template Hierarchy:
single-{post-type}.php (e.g., single-book.php)single.phpsingular.phpindex.phpsingle-book.php exists, WordPress will use it. If not, it will fall back to the next template in the hierarchy.Important Considerations: